
1. JumpServer Deployment Mode
Currently Jumpserver supports the following deployment options:
* Stand-alone deployment
* High Availability Deployment
* Cluster deployment
* Distributed deployment
But which specific scenarios using which deployment program, the best deployment program is what many users are not clear, this paper focuses on different scenarios for the enterprise as a starting point, a detailed description of different scenarios under the best JumpServer deployment program.
1.1. Stand-alone Deployment
JumpServer stand-alone deployment does not only refer to the use of a single machine deployment, but includes three major components are single node deployment (ie, components of a single node). So JumpServer standalone deployment is divided into All In One mode and independent deployment mode, as shown below:

Whether or not a stand-alone deployment is used depends on two main factors:
Number of concurrent access assets, ie, number of simultaneous online sessions
Number of assets under overall management
Table of recommended scenarios for standalone deployment:

1.2. Highly Available Deployment
As with standalone deployments, high availability deployments are also categorized into overall high availability (All in one high availability) and independent node high availability, as shown below:
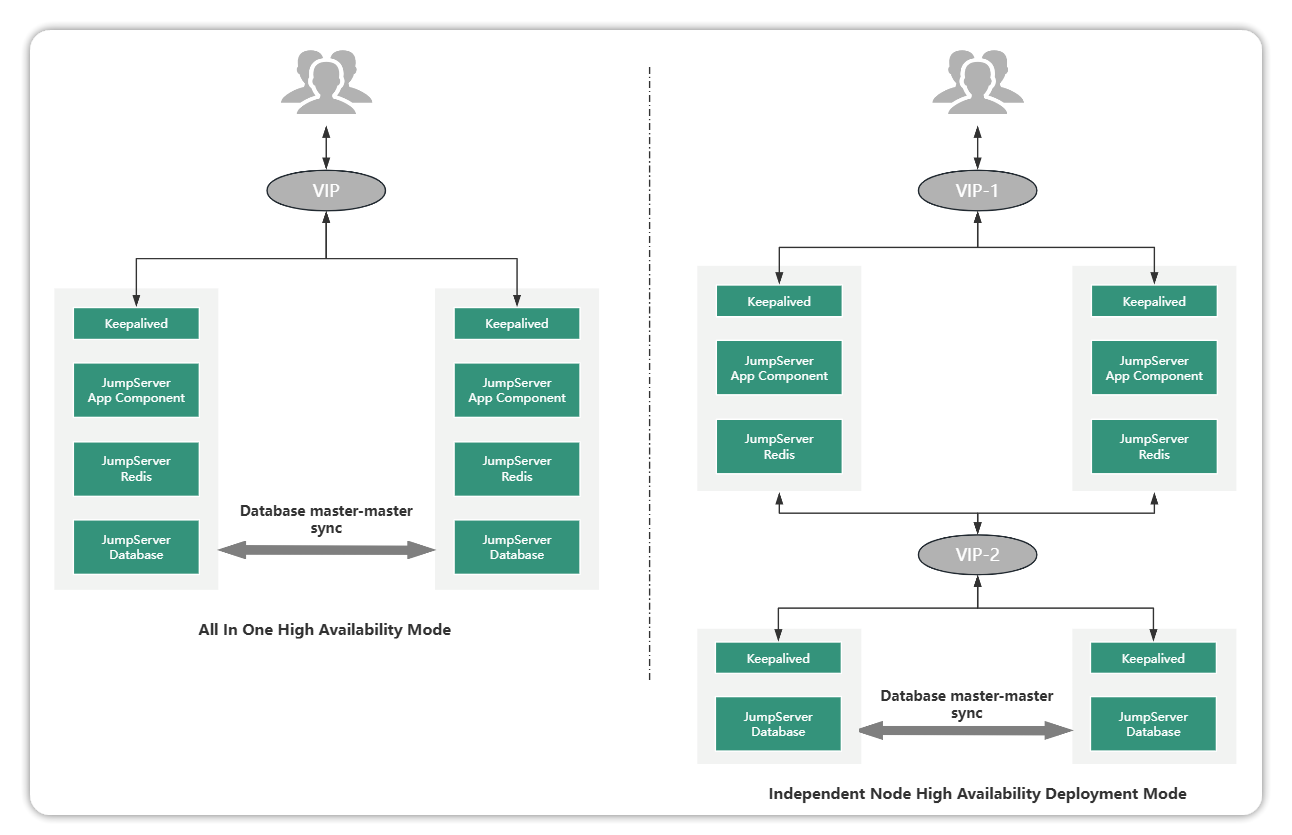
The essential difference between a highly available deployment scenario and a standalone deployment scenario is that the data integrity and service continuity requirements are different. Highly available deployment can meet the following two enterprise requirements on a single-machine deployment scenario:
Database data and video data can be backed up in real time;
The service can be provided continuously, when one of the master node has a problem can immediately switch to the backup node to continue to provide services.
Table of recommended scenarios for highly available deployments:

1.3. Cluster Deployment Scenarios
JumpServer cluster deployments are primarily used in asset access high concurrency scenarios with the goal of improving session processing.
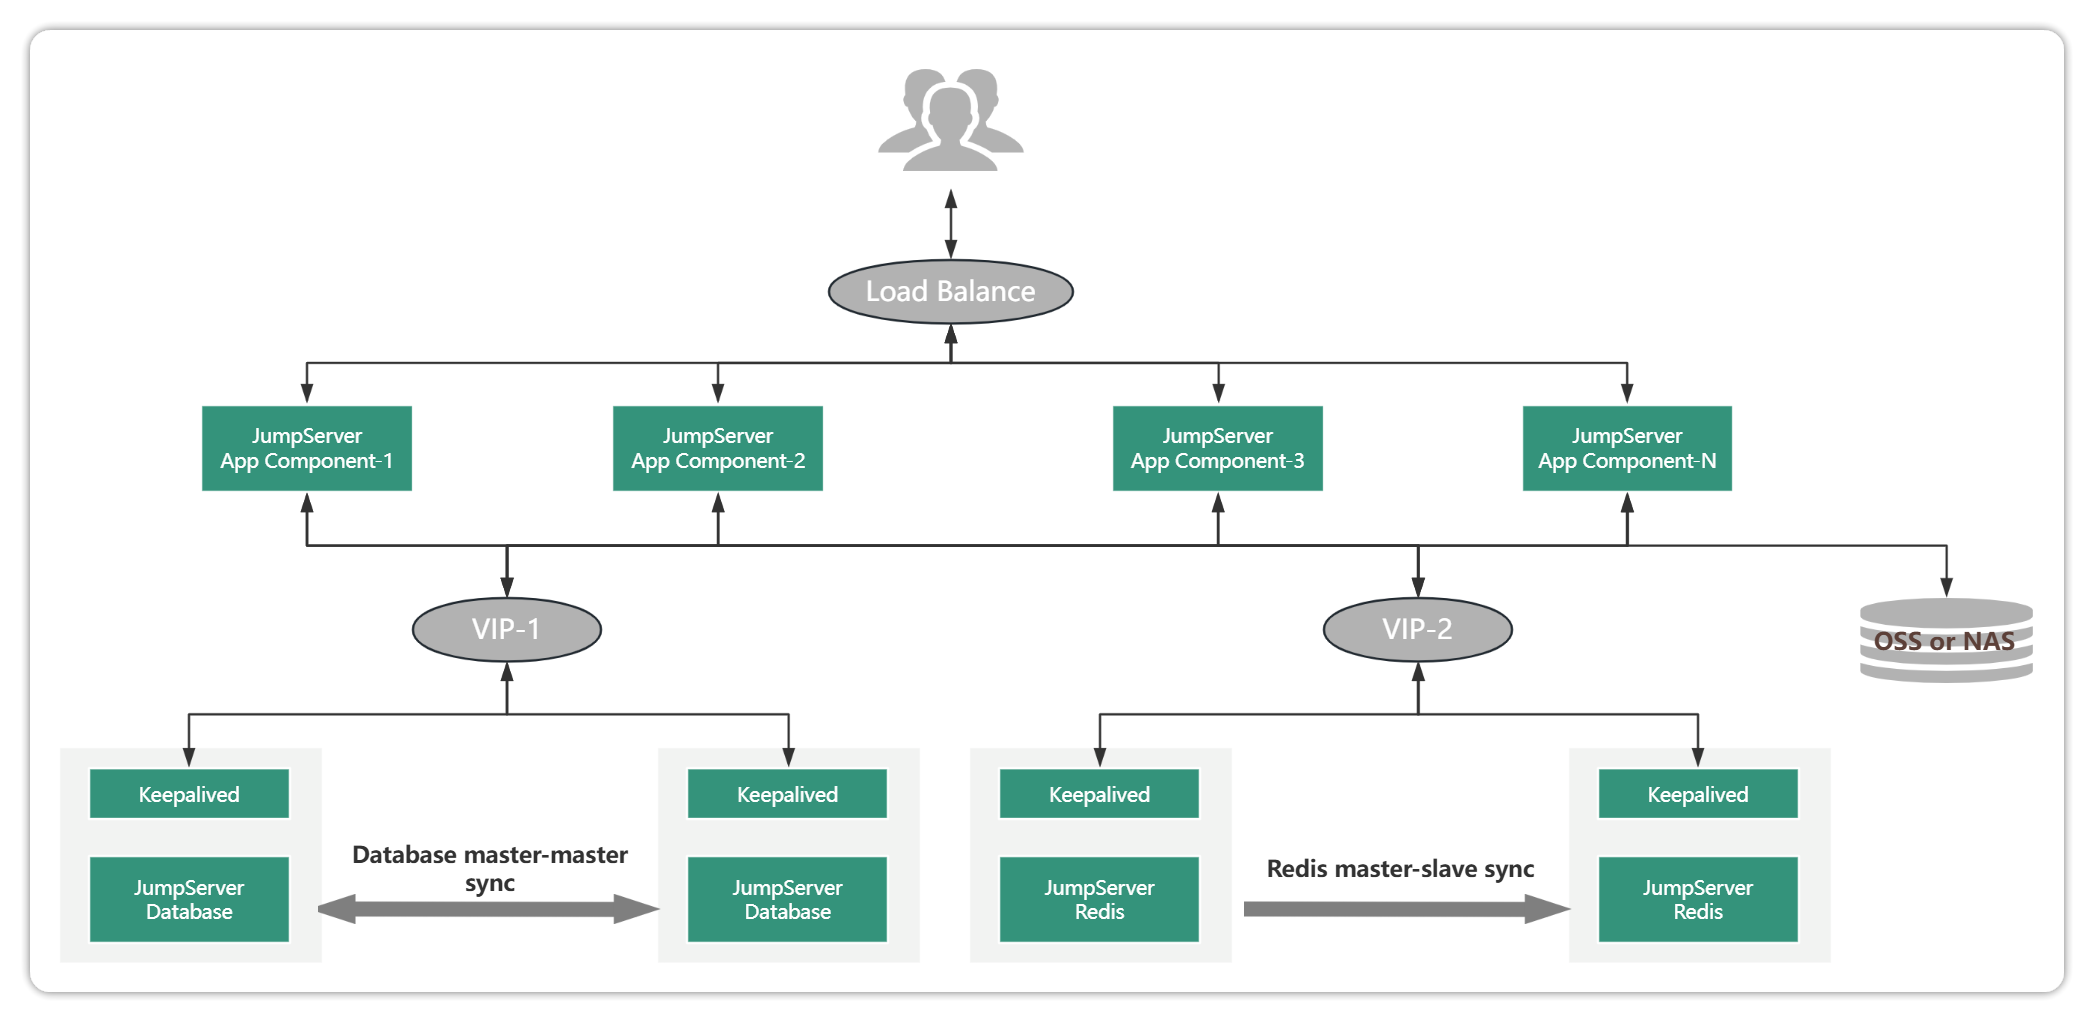
Cluster deployments also support high availability of business with the following features:
Higher number of assets and high concurrency of sessions (more than 200 or more concurrent character sessions, more than 100 or more graphic sessions).
The rapid increase in asset size and the increase in the volume of concurrent sessions require the JumpServer's processing capability to be able to rapidly scale with the increase in asset size;
Any node downtime does not affect the normal use of the platform, to ensure that the number of available nodes 1+ or more can ensure normal business access.
The size of the cluster can be dynamically scaled up and increased as the number of access concurrency increases, and is not directly related to the number of assets. Therefore, whether to use cluster deployment mainly depends on the number of concurrent access sessions.
Cluster Deployment Recommended Scenarios Table:

1.4 Distributed Deployment
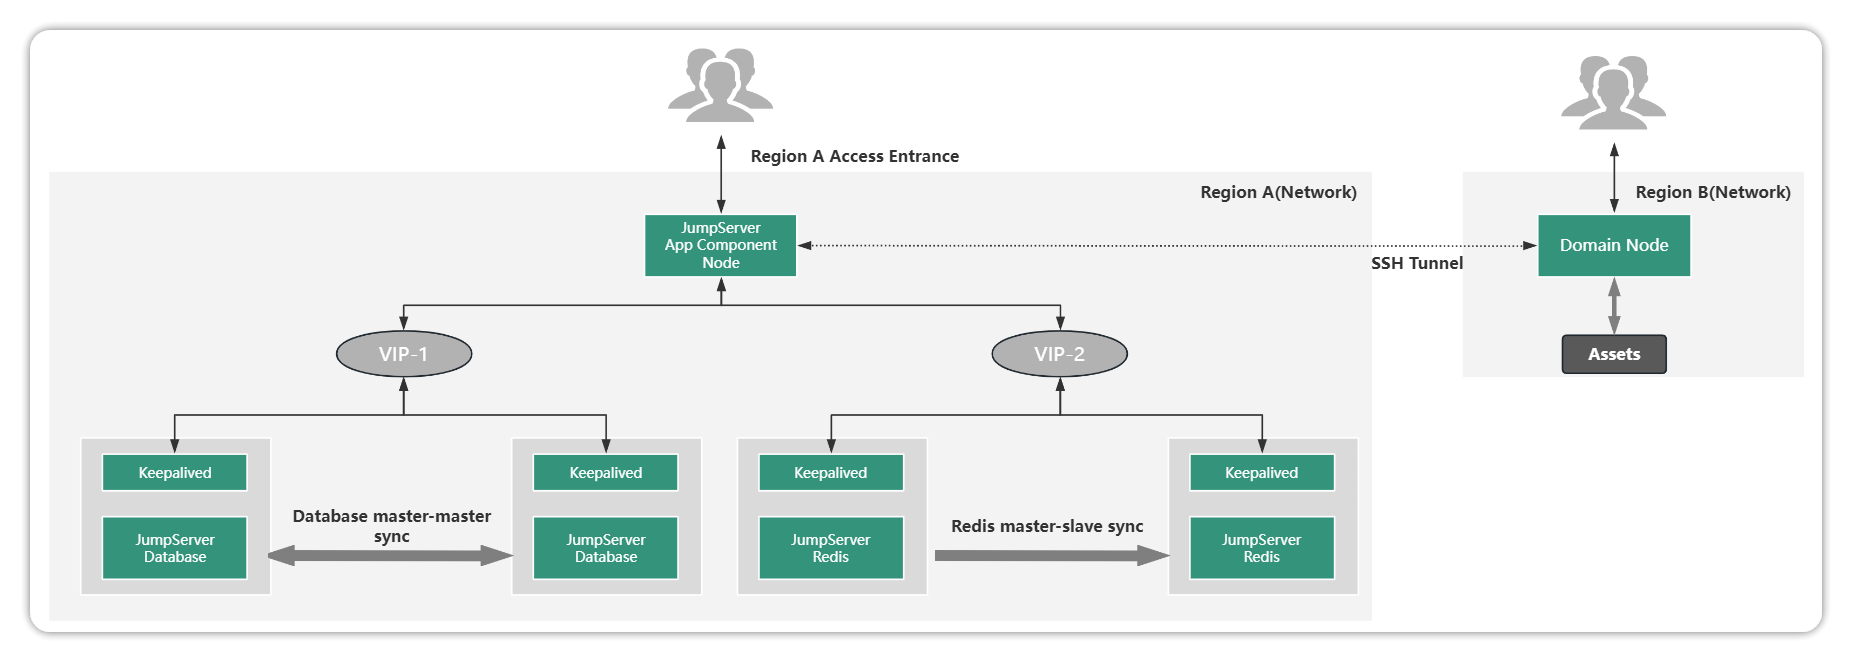
The JumpServer distributed deployment scenario is different from other scenario deployments. Distributed deployment is mainly used for assets distributed in multiple geographic regions or networks, and has corresponding requirements for accessing the operation and maintenance portal.
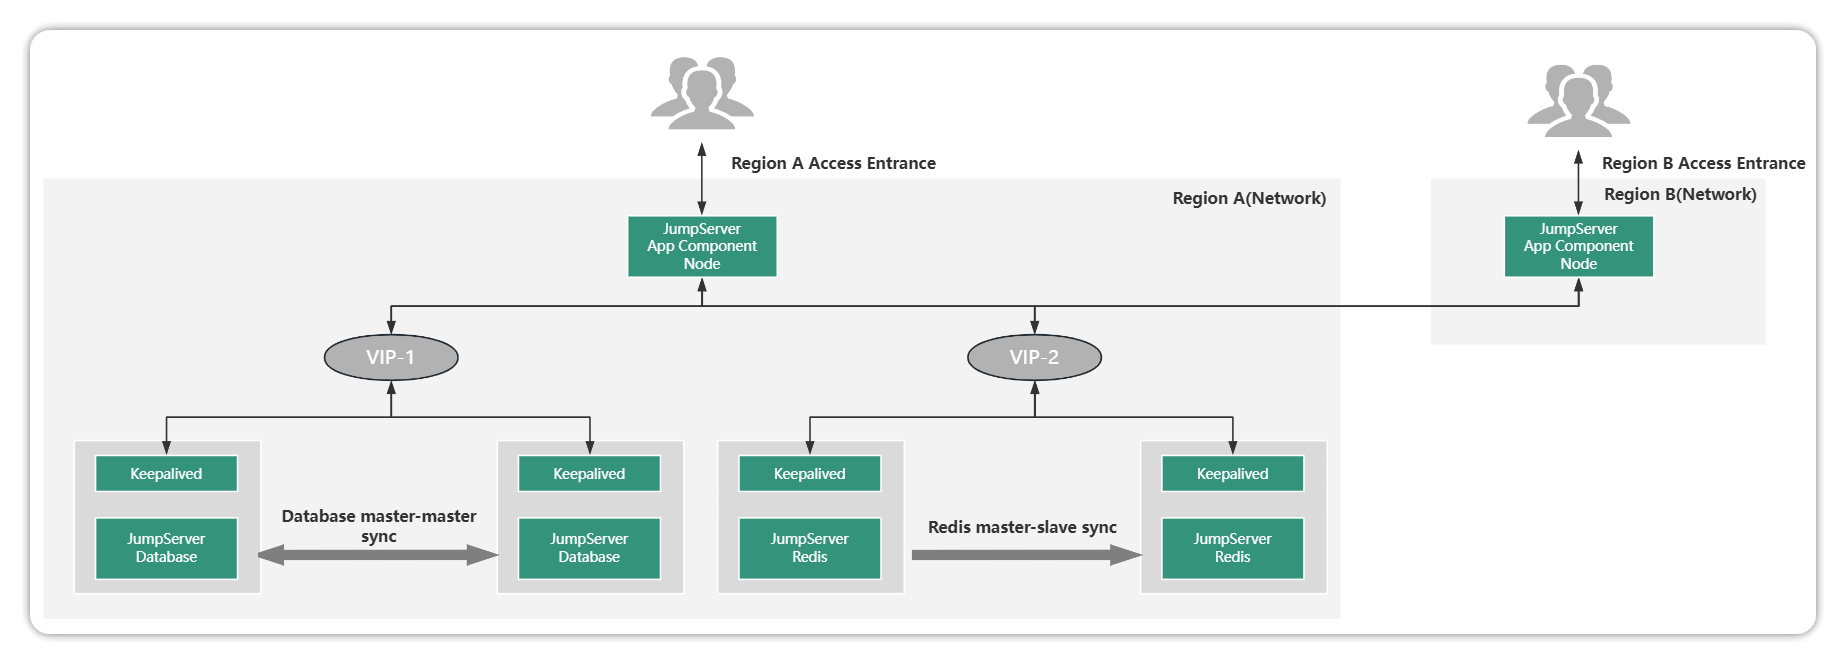
JumpServer distributed deployment has the following features:
The user's assets are distributed in different regional (network) locations and need to be managed in a unified manner through the JumpServer at the same time, and the personnel in different regions can access the JumpServer in close proximity;
Assets, users, permissions, auditing, etc. in different areas can be set up and managed uniformly by the administrator, or the administrator can set up a multi-tenant mode for management authority sharing.
Of course, if different geographical assets are also more concurrent or also require business continuity. Distributed deployment can be extended to cluster distributed deployment or high availability distributed deployment. The following:
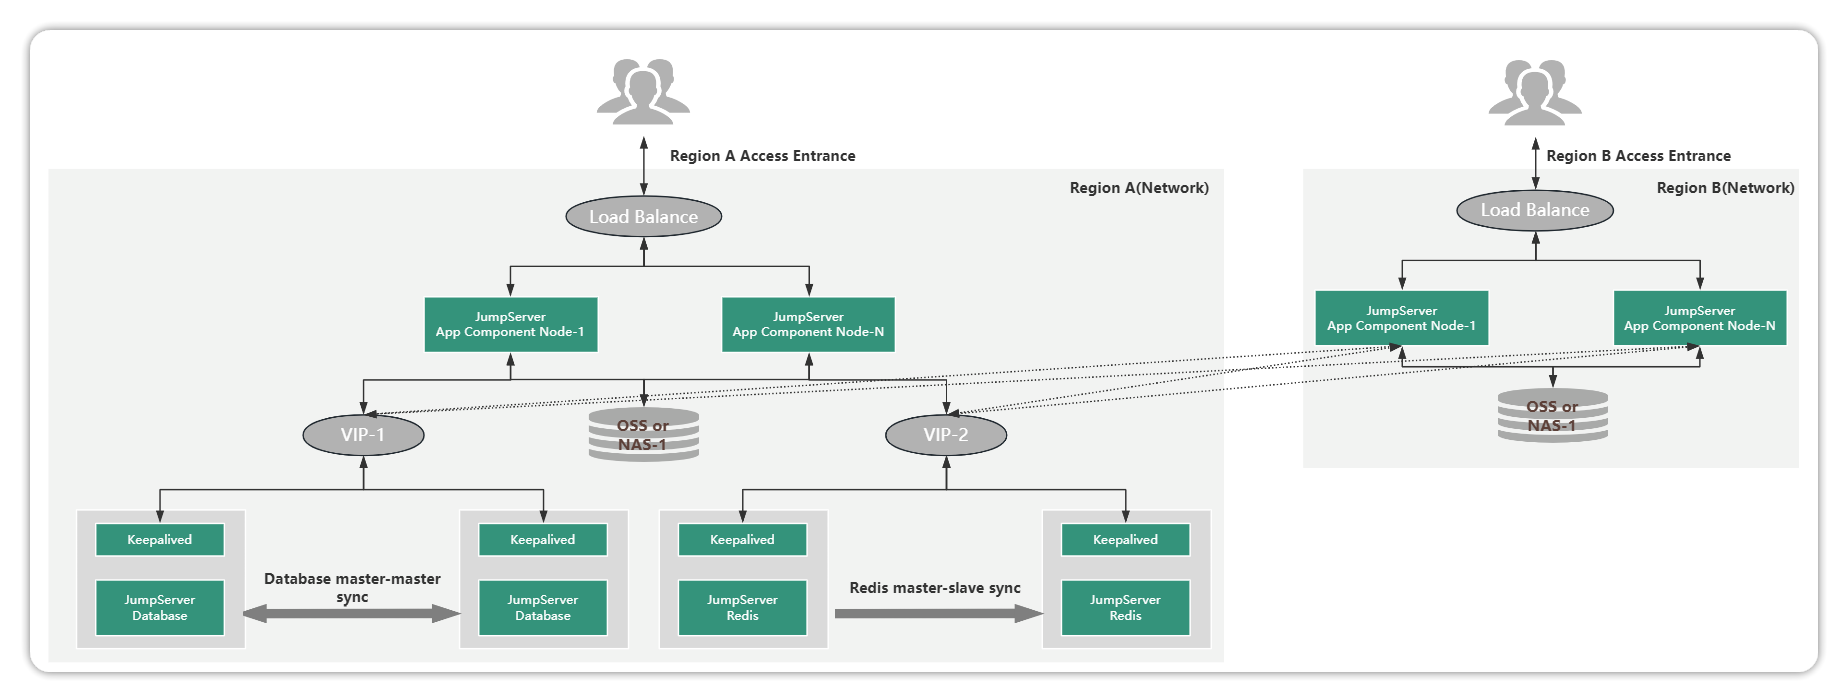
JumpServer Domain Distributed is different from the above scheme, Domain is mainly for the unified operation and maintenance entrance. If the concurrency of regional access is not high, and all personnel have centralized access, you can use the network domain solution.
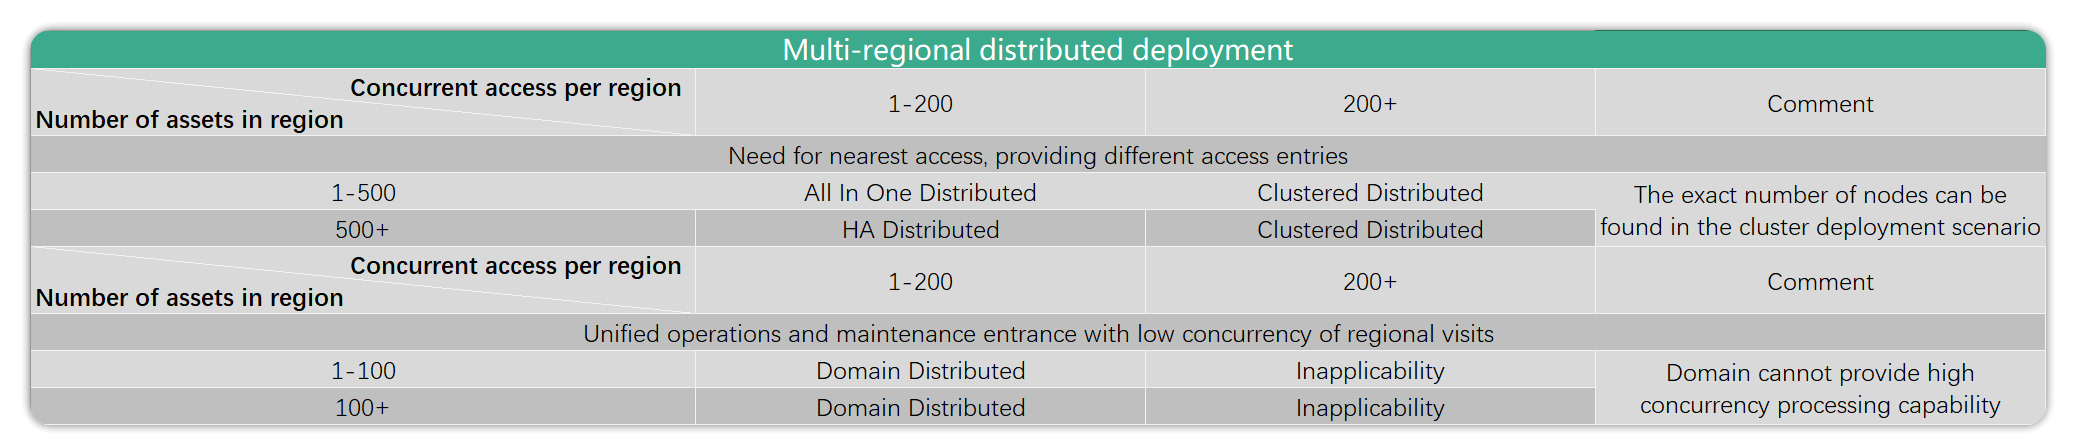
Distributed Deployment Recommended Scenarios Table:
2. Data Backup Recovery Instructions
2.1. Database Backup
2.1.1. Manual Backup
jmsctl backup_dbYou can directly execute the jmsctl command to backup the database, and the backup file location will be displayed when the backup is completed.
2.1.2. Scheduled Backup
Create this script on the JumpServer server
cat /opt/check_scripts/backup_db.sh
#!/bin/bash
CURRENT_DATE=`date +"%Y-%m-%d-%H:%M:%S"`
# Backup file name
BACKUP_FILE="${BACKUP_DIR}/jumpserver_db_backup_${CURRENT_DATE}.sql"
CONFIG_NAME="config_${CURRENT_DATE}.txt"
CONFIG_DIR="/opt/jumpserver/config/config.txt"
# Backup directory
BACKUP_DIR="/data/jms_backup"
# Number of days to keep backups
RETENTION_DAYS=7
# Check if the backup directory exists
[ ! -d${BACKUP_DIR}] && mkdir -p${BACKUP_DIR}
DB_DATABASE=$(cat${CONFIG_DIR}| grep -v "#"| grep -w "DB_NAME"| awk -F='{print $2}')
DB_USER=$(cat${CONFIG_DIR}| grep -v "#"| grep -w "DB_USER"| awk -F='{print $2}')
DB_PASSWORD=$(cat${CONFIG_DIR}| grep -v "#"| grep -w "DB_PASSWORD"| awk -F='{print $2}')
DB_PORT=$(cat${CONFIG_DIR}| grep -v "#"| grep -w "DB_PORT"| awk -F='{print $2}')
DB_HOST=$(cat${CONFIG_DIR}| grep -v "#"| grep -w "DB_HOST"| awk -F='{print $2}')
cp ${CONFIG_DIR} ${BACKUP_DIR}/${CONFIG_NAME}
docker exec jms_core mysqldump -u${DB_USER} -p${DB_PASSWORD} -h ${DB_HOST} ${DB_DATABASE} | > ${BACKUP_DIR}/${BACKUP_FILE}


if[ $? -eq 0 ];then
echo -e "\e[32m[SUCCESS] Backup succeeded! The backup file has been saved to: ${BACKUP_DIR}${BACKUP_FILE} \e[0m" >> ${BACKUP_DIR}/bak.log

else

echo -e "\e[31m[FAILED]: ${CURRENT_DATETIME} \e[0m" >> ${BACKUP_DIR}/bak.log

exit1
fi
# # Clean up backup data
find ${BACKUP_DIR} -type f -name *jumpServer*.sql -mtime +${RETENTION_DAYS} -exec rm -rf {} \;
Adding a crontab scheduled backup
chmod +x /opt/check_scripts/backup_db.sh
#Perform backups at 3 am every day
0 3 * * * /bin/bash/opt/check_scripts/backup_db.sh
2.2 Database Restoration
1. Check database connection information
cat /opt/jumpserver/config/config.txt | grep DB2. Copy the backup sql file into the container to restore the data
[root@jumpserver-v4 ~]#docker cp xxx.sql jms_core:/tmp/ #Transferring sql files into the core container
[root@jumpserver-v4 ~]# docker exec -it jms_core /bin/bash
root@jms_core:/# mysql -uroot -p
Enter password:
MariaDB [(none)]> show create database jumpserver; #Check database character set configuration
MariaDB [(none)]> drop database jumpserver; #Delete the original database. Please proceed with caution!
MariaDB [(none)]> CREATE DATABASE `jumpserver` /*!40100 DEFAULT CHARACTER SET utf8mb3 */;#Create new database
MariaDB [(none)]> use jumpserver;
MariaDB [(none)]> source /tmp/xxx.sql;
3. Startup services
Just go to the original version's installation package directory and reboot using the startup command.
[root@jumpserver-v4 ~]# cd /opt/jumpserver-ee-v4.4.1-x86_64/
# Pulling old version mirrors
[root@jumpserver-v4 jumpserver-ee-v4.4.1-x86_64]# ./jmsctl.sh start
3. Migration
3.1. Database Backup
Get database information in config.txt
DB_HOST:mysql #Database IP
DB_PORT: 3306 #Database port
DB_USER: jumpserver # User who connect to the database
DB_PASSWORD: ****** # Password of the user connecting to the database
DB_NAME: jumpserver # Database used by JumpServer
Go to the original version of the installation package directory and execute the backup command.
[root@jumpserver-v4 jumpserver-ee-v4.4.1-x86_64]# ./jmsctl.sh backup_db3.2. Modify The Database Character Set
Confirm the database character set to ensure that the database character set is the same before and after the migration.
MariaDB [(none)]> show create database jumpserver; #Check database character set configuration
MariaDB [(none)]> show create database jumpserver;
+------------+------------------------------------ ----------------------------------+
| Database | Create Database |
+------------+------------------------------------ ----------------------------------+
| jumpserver | CREATE DATABASE `jumpserver` /*!40100 DEFAULT CHARACTER SET utf8mb3 */ |
+------------+------------------------------------ ----------------------------------+
1 row in set (0.000 sec)
3.3. Download JumpServer Installer
[root@jumpserver ~]# cd /opt/
[root@jumpserver opt]# wget https://support.fit2cloud.com/download/0293da74-3970-4d3e-906e-b9ce420361b2/ jumpserver-ee-v4.4.1-x86_64.tar.gz
[root@jumpserver opt]# tar -xf jumpserver-ee-v4.4.1-x86_64.tar.gz
[root@jumpserver opt]# cd jumpserver-ee-v4.4.1-x86_64/
3.4. Edit The Temporary Configuration File
[root@jumpserver jumpserver-ee-v4.4.1-x86_64]# vimconfig-example.txt
# Modify the following options and leave the rest as default
### Data persistence directory, please do not change it after installation, you can use other directories such as: /data/jumpserver
VOLUME_DIR=/data/jumpserver
### Note: If the SECRET_KEY does not match the old version, the encrypted data cannot be decrypted.
# Core configuration
### Cannot be changed after startup, otherwise passwords and other information cannot be decrypted.
SECRET_KEY= # Get the configuration file from an older version and fill it in with (*)
BOOTSTRAP_TOKEN= # Get the configuration file from an older version and fill it in with (*)
3.5. JumpServer Deployment
3.5.1.Using The Built-in Database
[root@jumpserver jumpserver-ee-v4.4.1-x86_64]# ./jmsctl.sh install
#Just go all the way back to the default options to install
[root@jumpserver ~]# docker exec -it jms_mysql bash
root@jms_mysql:/# mysql -uroot -p$MARIADB_ROOT_PASSWORD
MariaDB [(none)]>drop database jumpserver;
MariaDB [(none)]> CREATE DATABASE `jumpserver` /*!40100 DEFAULT CHARACTER SET utf8mb3 */;
#Importing data from an older version of the database into the database
[root@jumpserver jumpserver-ee-v4.4.1-x86_64]# ./jmsctl.sh restore_db /opt/jumpserver.sql   #jumpserver.sqlis the old version of the database backup sql file

#Start the service after the data import is complete
[root@jumpserver jumpserver-ee-v4.4.1-x86_64]# ./jmsctl.sh start
3.5.2. Use Of External Database
[root@jumpserver jumpserver-ee-v4.4.1-x86_64]# ./jmsctl.sh install

…
4.Configure DB
Use external MySQL? (y/n) (default is n): y
Please enter the MySQL host address (no default): 192.168.100.1#External database IP
Please enter the MySQL port (default is 3306): 3306
Please enter the MySQL database (default is jumpserver): jumpserver# Database name
Please enter your MySQL username (no default): jumpserver   # username
Please enter the MySQL password (no default): Password  # password
Finish

5.Configure Redis
Do you want to use external Redis? (y/n) (default is n): y
Please enter the Redis host address (no default): 192.168.100.11
Please enter the Redis port (default is 6379): 6379
Please enter the Redis password (no default): weakPassword
…

# Importing data from an older version of the database into the database
[root@jumpserver ~]# docker exec -it jms_core bash
root@jms_core:/opt/jumpserver# mysql -uroot -p -h 192.168.100.11 jumpserver < jumpserver.sql #Older versions of backup sql files

# Start the service after the data import is complete
[root@jumpserver jumpserver-offline-release-v3.10.10-amd64]# ./jmsctl.sh start
3.5.3. Using An Old External Database
[root@jumpserver jumpserver-offline-release-v3.10.10-amd64]# ./jmsctl.sh install

# Press Enter all the way to install by default. After the installation is complete, modify the database connection address and redis connection address

[root@jumpserver ~]# vim /opt/jumpserver/config/config.txt
################################### MySQL Configuration##################################
# External MySQL requires correct MySQL information to be entered, the built-in MySQL system will automatically handle it#
DB_HOST=192.168.21.1
DB_PORT=3306
DB_USER=root
DB_PASSWORD=ZGE4MTNiNDItMzRhMi1mMjd
DB_NAME=jumpserver

#################################### Redis Configuration####################################
# External Redis requires you to enter the correct Redis information, the built-in Redis system will automatically handle it#
REDIS_HOST=192.168.21.2
REDIS_PORT=6379
REDIS_PASSWORD=ZGE4MTNiNDItMzRhMi1mMjdhLW

# Start the service after the modification is completed
[root@jumpserver jumpserver-offline-release-v3.10.10-amd64]# ./jmsctl.sh start
4. Log Troubleshooting Method
Each JumpServer component is responsible for different modules. You need to check the relevant logs of the corresponding component according to the usage function. You can also enable debug logs to display more detailed information.
4.1. Core Components
The core component is the core component of jumpserver. Other components depend on this component to start. Login authentication related logs are generally checked under this core component log.
Celery is a component that processes asynchronous tasks and is used to execute automated tasks related to JumpServer. The celery component and the core component use the same container, so the logs of the celery component can also be viewed under the core.
View container operation logs
[root@jumpserver ~]#docker logs -f jms_core --tail 200Persistent Directory
[root@jumpserver ~]# ls -al /data/jumpserver/core/data/logs/Enter the container to view
[root@jumpserver ~]# docker exec -it jms_core bash
root@jms_core:/opt/jumpserver# cd data/logs/
root@jms_core:/opt/jumpserver/data/logs# ls
2024-06-24 celery_ansible.log#celery log  drf_exception.log jumpserver.log#core log mainly looks at this   jumpserver.log.3 ansible.log celery_default.log# celery logbeat.log celery.log  #celery log        gunicorn.log
4.2. Koko Components
The koko component is a component that serves Unix-like asset platforms, providing character-based connections via SSH, Telnet protocols.
[root@jumpserver ~]# docker logs -f jms_koko --tail 200Persistent Directory
[root@jumpserver ~]# ls -al /data/jumpserver/koko/data/logs/Enter the container to view
[root@jumpserver ~]# docker exec -it jms_koko bash
root@jms_koko:/opt/koko# cd data/logs/
root@jms_koko:/opt/koko/data/logs# ls
koko.log
4.3. Lion Components
Lion is a component serving the Windows system platform, used for web-based access to Windows assets
[root@jumpserver ~]# docker logs -f jms_lion --tail 200Persistent Directory
[root@jumpserver ~]# ls -al /data/jumpserver/lion/data/logs/Enter the container to view
[root@jumpserver ~]# docker exec -it jms_lion bash
root@jms_lion:/opt/lion# cd data/logs/
root@jms_lion:/opt/lion/data/logs# ls
guacd.log lion.log #lion log
4.4. Web Components
Web components are used to provide the front-end page of JumpServer
[root@jumpserver ~]#docker logs -f jms_web --tail 200Persistent Directory
[root@jumpserver ~]# ls -al /data/jumpserver/nginx/data/logs/Enter the container to view
root@jms_web:/opt# cd /var/log/nginx/

root@jms_web:/var/log/nginx# ls

access.log tcp-access.log      error.log
4.5. Razor Components
Razor is a component that serves the RDP protocol. By default, JumpServer Client uses Razor components to access Windows assets..
[root@jumpserver ~]#docker logs -f jms_razor --tail 200Persistent Directory
[root@jumpserver ~]# ls -al /data/jumpserver/razor/data/logs/Enter the container to view
[root@jumpserver ~]# docker exec -it jms_razorbash
root@jms_razor:/opt/razor# cd data/logs/
root@jms_razor:/opt/razor/data/logs# ls
razor.log
4.6. Chen Component
Chen is a component that serves the database and is used to access database assets through a Web GUI.
[root@jumpserver ~]#docker logs -f jms_chen --tail 200Persistent Directory
[root@jumpserver ~]# ls -al /data/jumpserver/chen/data/logs/Enter the container to view
[root@jumpserver ~]# docker exec -it jms_chen bash
root@jms_chen:/opt/chen# cd data/logs/
root@jms_chen:/opt/chen/data/logs# ls
chen.log wisp.log
Description of each component:
Core: The Core component is the core component of JumpServer, and other components depend on this component to start.
Koko: Koko is a component that serves Unix-like asset platforms and provides character-based connections through SSH and Telnet protocols.
Lion: Lion is a component that serves the Windows asset platform and is used to access Windows assets from the Web.
XRDP: XRDP is a component that serves the RDP protocol. Its main function is to access the assets of Windows 2000, XP and other systems through JumpServer Client.
Razor: Razor is a component that serves the RDP protocol. By default, JumpServer Client uses Razor components to access Windows assets.
Magnus: Magnus is a component that serves the database and is used to access database assets through client agents.
Chen: Chen is a component that serves the database and is used to access database assets through a Web GUI.
Celery: Celery is a component for processing asynchronous tasks and is used to perform automated tasks related to JumpServer.
Video: Video is specifically used to convert the video formats generated by Razor components and Lion components, converting the generated session videos into MP4 format.
Panda: Panda is an application publishing machine based on a domestic operating system, used to schedule Virtualapp applications.
Nec: Nec is a component that provides a connection to a VNC asset via a VNC client proxy connection.
Facelive: Facelive is a multi-factor authentication component used to support face authentication.
5. Security Policy Settings
5.1. Description Of Open Ports of JumpServer Host
The JumpServer host administrator can open the following related ports on the network and host side according to the JumpServer component deployment plan and bastion host usage plan in the actual environment.
5.2. Account Types Allowed To Access
5.2.1. Local Account
User accounts created and managed within JumpServer can be added, deleted, and assigned permissions through the JumpServer admin backend
5.2.2. LDAP/AD Account
External user accounts integrated through LDAP or Active Directory. After configuring LDAP/AD integration in JumpServer, users can authenticate and log in using their LDAP/AD accounts.
5.2.3. SSO (Single Sign-On) Account
External user accounts integrated through single sign-on. After configuring SSO (such as OAuth, SAML) integration in JumpServer, users can log in to JumpServer through SSO.
6. JumpServer Connection Method
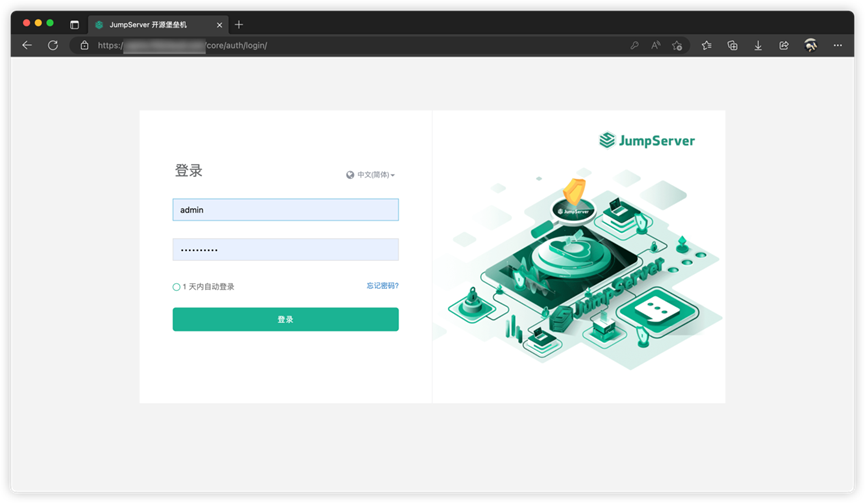
6.1. Web Access
Access the Jumpserver web page through a browser
6.2. Command Line Access
6.2.1. SSH Command Line Connection To JumpServer
Command format:
ssh jumpserverUsername@jumpserverHostIP -p2222jumpserverUsername: the user who logs in to the jumpserver.
jumpserverHostIP: JumpServer's access address, either IP or domain name.
2222: Jumpserver command line connection port, the default is port 2222.
The connection is successful as shown in the following figure:
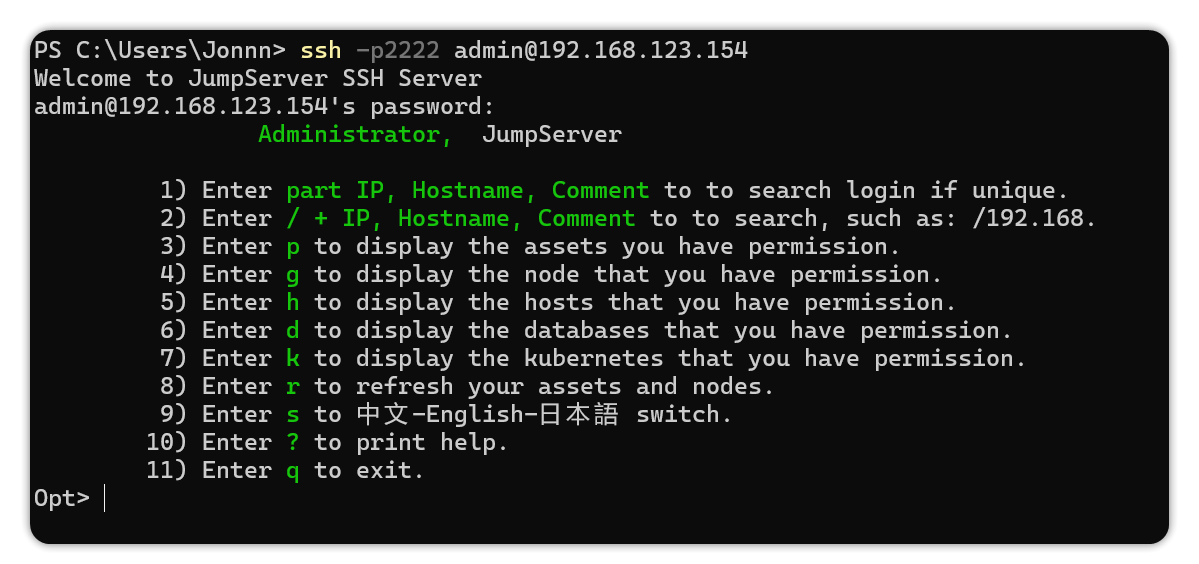
After the connection is successful, you can follow the command prompts to connect to the asset operation
Note: Currently this method does not support asset connection login via RDP protocol.
6.2.2. Using the ssh command line to directly connect to assets managed by JumpServer
Command format:
ssh -p2222 jumpserverUsername@systemUsername@AssetIP@jumpserverHostIPjumpserverUsername: the user who logs in to the jumpserver.
systemUsername: The account name used to connect to the asset.
AssetIP: The IP of the connected asset.
jumpserverHostIP: JumpServer's access address, either IP or domain name.
2222: Jumpserver command line connection port, the default is port 2222.
The connection is successful as shown in the following figure:
